오늘의 목표는 Redux saga 어떨 때 써야하는지, 어떻게 쓰는지 알아보기.
About Redux-Saga
redux-saga is a library that aims to make application side effects (i.e. asynchronous things like data fetching and impure things like accessing the browser cache) easier to manage, more efficient to execute, easy to test, and better at handling failures.
The mental model is that a saga is like a separate thread in your application that's solely responsible for side effects. redux-saga is a redux middleware, which means this thread can be started, paused and cancelled from the main application with normal redux actions, it has access to the full redux application state and it can dispatch redux actions as well.
It uses an ES6 feature called Generators to make those asynchronous flows easy to read, write and test. (if you're not familiar with them here are some introductory links) By doing so, these asynchronous flows look like your standard synchronous JavaScript code. (kind of like async/await, but generators have a few more awesome features we need)
You might've used redux-thunk before to handle your data fetching. Contrary to redux thunk, you don't end up in callback hell, you can test your asynchronous flows easily and your actions stay pure.
출처: Redux-Saga
redux-saga는 application의 side effects(부수 효과)를, 예를들면 비동기 처리와 브라우저 캐시같은 순수하지 않은것들을 처리 하기 위한 라이브러리다. 관리하기 쉽고, 효율적인 실행이 가능하며, 테스트하기 쉬울 뿐 아니라 더 나은 실패 처리가 가능하다.
saga는 어플리케이션에서 side effect를 책임지는 별도의 스레드같은 역할을 한다. redux-saga는 main 애플리캐이션에서 보통의 리덕스의 action들에 의해 시작 되어지고, 정지 또는 취소 되어질 수 있는 리덕스 미들웨어다. 이 미들웨어는 리덕스 애플리캐이션의 state, action들을 dispatch하는 것에도 접근 할 수 있다.
ES6 문법인 Generators는 비동기 흐름을 읽고 쓰고 테스트하기 쉽게 만들어 준다. 이러한 비동기적인 흐름은 동기인 표준 자바스크립트 코드와 생김새가 유사하다. (async/await와 비슷하지만 generators는 우리가 필요로 하는 특징들을 몇 가지 더 갖추고 있다.)
아마도 대부분은 data fetching을 위해 redux-thunk를 사용해 왔겠지만, rudux saga는 thunk와는 달리 callback hell에 빠지지 않으며, 비동기 흐름을 손쉽게 테스트 하며 actions 또한 순수한 함수로 유지 할 수 있다.
다시말해,
redux-saga는 비동기적으로 dispatch를 사용하고, 여러번 api요청을 할 경우 같은 까다로운 비동기 작업을 다룰 때 아주 유용하다.
Generator란?
function* 키워드를 사용해 만든 제너레이터 함수를 호출했을 때 반환되는 객체를 제너레이터 또는 이터레이터(iterator)객체라고 한다.
이 제너레이터의 내부 코드를 실행하기 위해 객체가 가지고있는 next 메서드를 호출해야 한다.
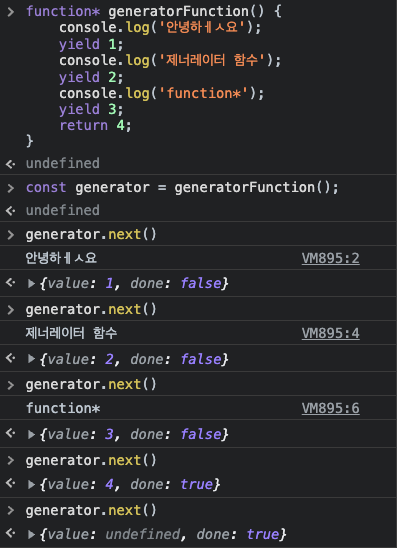
이는 yield 키워드를 반환 포인트로 여기며 value와 done 프로퍼티를 가진 새로운 객체를 반환한다.
다시 말해, yield 키워드를 포인트로 코드의 흐름을 멈추고, next 메서드를 호출하는 방식으로 일시정지와 재시작 기능을 사용할 수 있다.
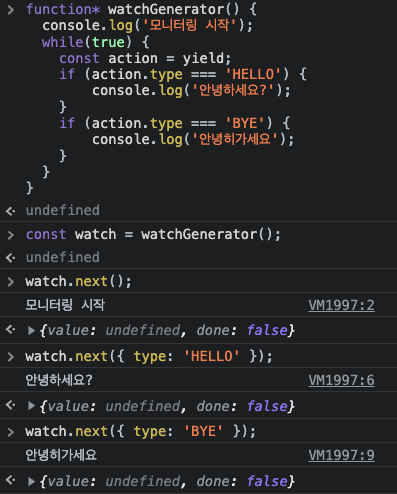
watch라는 함수는 watchGenerator로부터 제너레이터를 전달받고 next 메서드를 통해 내부 코드를 실행시킨다. watchGenerator 내부에서는 while문을 통해 액션을 기다리고, next 메서드의 인자를 통해 전달 받은 액션을 계속해서 모니터링하고 있다가 특정 액션이 디스패치 된 경우 실행해야하는 worker 함수를 호출한다.
실습 예제 따라 해보기
# 하단의 References에 실습 예제의 해당 동영상과 소스코드를 참고해주세요
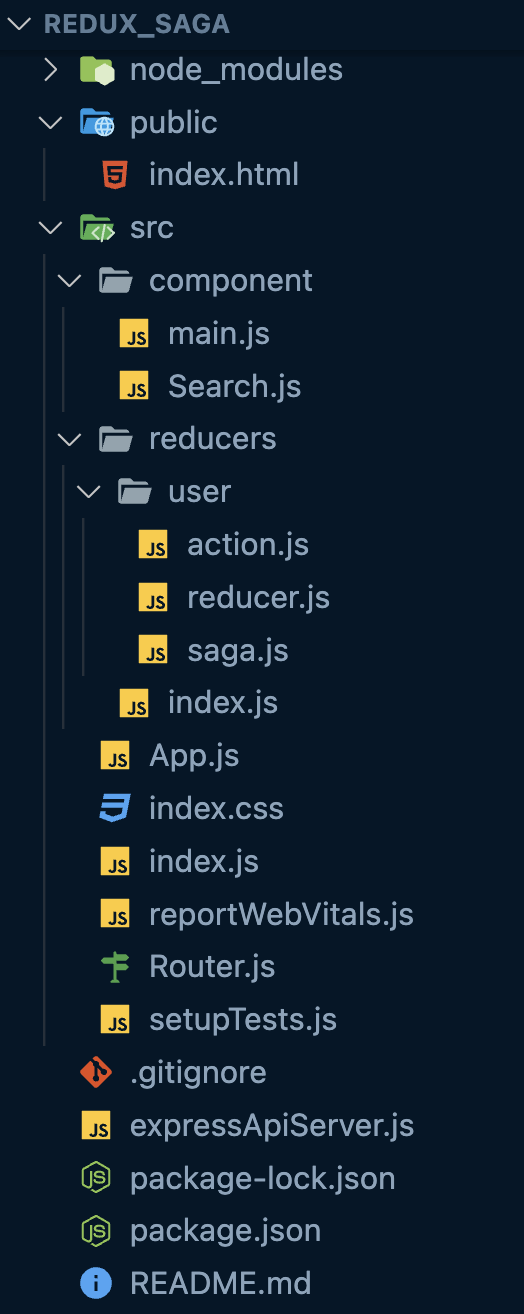
실습 결과의 폴더 구조는 아래와 같습니다
1. CRA로 원하는 경로에 redux_saga 란 프로젝트 생성
create-react-app redux_saga
2. react-router-dom 설치
npm i react-router-dom
3. index.js 에서 App 컴포넌트를 BrowserRouter로 감싸기 src > index.js
// src > index.js

import React from "react";
import ReactDOM from "react-dom/client";
import "./index.css";
import App from "./App";
import reportWebVitals from "./reportWebVitals";
import { BrowserRouter } from "react-router-dom";

const root = ReactDOM.createRoot(document.getElementById("root"));
root.render(
  <React.StrictMode>
      <BrowserRouter>
        <App />
      </BrowserRouter>
  </React.StrictMode>
);

// If you want to start measuring performance in your app, pass a function
// to log results (for example: reportWebVitals(console.log))
// or send to an analytics endpoint. Learn more: https://bit.ly/CRA-vitals
reportWebVitals();
4. Main.js : 메인 페이지 src > component > Main.js
// src > component > Main.js

import React from "react";

const Main = (props) => {

  return (
    <div>
      <div>
        <Link to="/search">검색 페이지로</Link>
      </div>
      메인페이지
      <div>{"검색된 사용자 수 => " + 0}</div>
    </div>
  );
};

export default Main;
5. Search.js : 검색 페이지 src > component > Search.js
// src > component > Search.js

const { Link } = require("react-router-dom");

const Search = (props) => {

  return (
    <>
      <div>
        <div>
          <Link to="/">메인 페이지로</Link>
        </div>
      </div>
      검색페이지
      <div>
        <input />
        <button>검색</button>
        <div>
          <table>
            <thead>
              <tr>
                <th>이름</th>
                <th>전화번호</th>
                <th>이메일</th>
              </tr>
            </thead>
            <tbody>
                <tr>
                  <td></td>
                  <td></td>
                  <td></td>
                </tr>
            </tbody>
          </table>
        </div>
      </div>
    </>
  );
};

export default Search;
6. Router.js를 src 폴더에 생성 src > Router.js
// src > Router.js

import React from "react";
import { Routes, Route } from "react-router-dom";
import Main from "./component/main";
import Search from "./component/Search";

const Router = () => {
  return (
    <Routes>
      <Route path="/search" element={<Search />} />
      <Route path="/" element={<Main />} />
    </Routes>
  );
};

export default Router;
7. App.js 에서 Router 컴포넌트를 렌더링 해주기 src > App.js
// src > App.js

import Router from "./Router";
function App() {
  return <Router />;
}

export default App;
8. npm start로 페이지가 잘 라우팅 되었는지 확인 해 본다.
메인 페이지

검색 페이지

9. redux, react-redux 설치
npm i redux
npm i react-redux
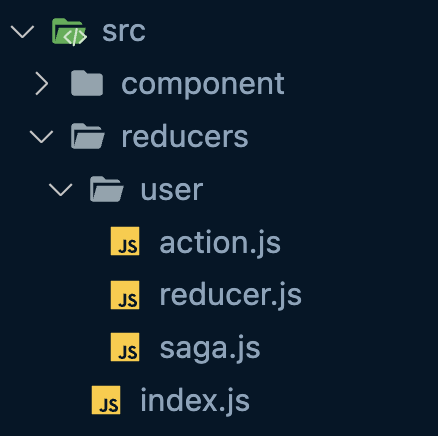
10. src 폴더 아레 reducers라는 폴더를 생성하고 그 안에 다음과 같이 구성해주기
11. action.js src > user > action.js
// src > user > action.js

// 검색 요청시에 대한 액션
export const SEARCH_USERS_REQ = "SEARCH_USERS_REQ";
// 검색 성공에 대한 액션
export const SEARCH_USERS_SUCCESS = "SEARCH_USERS_SUCCESS";
// 검색 실패시에 대한 액션
export const SEARCH_USERS_FAIL = "SEARCH_USERS_FAIL";

export const searchUsersReq = (params) => {
  // 검색 요청시 params로 검색 조건을 전달하는 액션함수
  return {
    type: SEARCH_USERS_REQ,
    params,
  };
};

export const searchUsersSuccess = (data) => {
  // 검색 성공시 결과를 data로 전달하여 전역 상태인 useList를 변화시키는 액션함수
  return {
    type: SEARCH_USERS_REQ,
    data,
  };
};

export const searchUsersFail = (error) => {
  // 검색 실패시 결과를 error 전달하는 액션함수.
  return {
    type: SEARCH_USERS_REQ,
    error,
  };
};
12. reducer.js src > user > reducer.js
// src > user > reducer.js

import {
  SEARCH_USERS_REQ,
  SEARCH_USERS_SUCCESS,
  SEARCH_USERS_FAIL,
} from "./action";

// 사용자 리스트를 의미하는 useList를 배열로 초기화 하고 시작
const initialState = {
  userList: [],
};

const userReducer = (state = initialState, action) => {
  switch (action.type) {
    case SEARCH_USERS_REQ:
      return {
        ...state,
        error: null,
      };
    case SEARCH_USERS_SUCCESS:
      return {
        ...state,
        userList: action.data,
      };
    case SEARCH_USERS_FAIL:
      return {
        ...state,
        error: action.error,
      };

    default:
      return state;
  }
};

export default userReducer;
13. 리듀서들을 내보내고 스토어를 설정 src > reducers > index.js & src > index.js
// src > reducers > index.js

import { combineReducers } from "redux";
import { fork, all } from "redux-saga/effects";
import userReducer from "./user/reducer";
import userSaga from "./user/saga";

export const reducers = combineReducers({
  userReducer,
});

// 사가 함수를 작성할땐 * 별표 키워드와 함께 시작
export function* rootSaga() {
  yield all([fork(userSaga)]);
}
// src > index.js

import React from "react";
import ReactDOM from "react-dom/client";
import "./index.css";
import App from "./App";
import reportWebVitals from "./reportWebVitals";
import { BrowserRouter } from "react-router-dom";
import { Provider } from "react-redux";
import { reducers} from "./reducers";

const root = ReactDOM.createRoot(document.getElementById("root"));
root.render(
  <React.StrictMode>
    <Provider store={store}>
      <BrowserRouter>
        <App />
      </BrowserRouter>
    </Provider>
  </React.StrictMode>
);

// If you want to start measuring performance in your app, pass a function
// to log results (for example: reportWebVitals(console.log))
// or send to an analytics endpoint. Learn more: https://bit.ly/CRA-vitals
reportWebVitals();
14. connect 함수를 이용해 리덕스를 컴포넌트에 연결한다.
# connect 함수는 요새 거의 쓰이지 않지만 기존 리덕스의 유지보수를 위해 알아 둘 필요가 있음
Main.js
// Main.js

import React from "react";
import { Link } from "react-router-dom";
import { connect } from "react-redux";

const Main = (props) => {
  const { } = props;

     console.log(props);

  return (
    <div>
      <div>
        <Link to="/search">검색 페이지로</Link>
      </div>
      메인페이지
      <div>{"검색된 사용자 수 => " + 0}</div>
    </div>
  );
};

const mapStateToProps = (state) => {
  return {
    userList: state.userReducer.userList,
  };
};

export default connect(mapStateToProps, null)(Main);
main페이지에서 props로 전역상태가 넘어오는지 확인하기

잘 넘어오는 것을 확인하면
Main.js에서 const { userList = [] } = props; 로 바꿔주고, 검색된 사용자 수 => userList.length 로 바꿔준다.
import React from "react";
import { Link } from "react-router-dom";
import { connect } from "react-redux";

const Main = (props) => {
  const { userList = [] } = props;

  //   console.log(props);

  return (
    <div>
      <div>
        <Link to="/search">검색 페이지로</Link>
      </div>
      메인페이지
      <div>{"검색된 사용자 수 => " + userList.length}</div>
    </div>
  );
};

const mapStateToProps = (state) => {
  return {
    userList: state.userReducer.userList,
  };
};

export default connect(mapStateToProps, null)(Main);
Search.js 페이지도 동일하게 console.log 로 props 가 잘 넘어오는지 확인하고 다음과 같이 작성
import { useState } from "react";
import { connect } from "react-redux";
import { searchUsersReq } from "../reducers/user/action";

const { Link } = require("react-router-dom");

const Search = (props) => {
  const { userList = [], searchUsers } = props;
  const [name, setName] = useState("");

  return (
    <>
      <div>
        <div>
          <Link to="/">메인 페이지로</Link>
        </div>
      </div>
      검색페이지
      <div>
        <input value={name || ""} onChange={(e) => setName(e.target.value)} />
        <button onClick={() => searchUsers(`?name=${name}`)}>검색</button>
        <div>
          <table>
            <thead>
              <tr>
                <th>이름</th>
                <th>전화번호</th>
                <th>이메일</th>
              </tr>
            </thead>
            <tbody>
                <tr>
                  <td></td>
                  <td></td>
                  <td></td>
                </tr>
            </tbody>
          </table>
        </div>
      </div>
    </>
  );
};

const mapDispatchToProps = (dispatch) => {
  return {
    searchUsers: (params) => dispatch(searchUsersReq(params)),
  };
};

const mapStateToProps = (state) => {
  return {
    userList: state.userReducer.userList,
  };
};

export default connect(mapStateToProps, mapDispatchToProps)(Search);
15. express api 서버 실행 위해 파일 생성
// expressApiServer.js

const express = require("express");
const app = express();
const cors = require("cors");
const port = 8080;

app.use(cors({ origin: true, credentials: true }));

app.get("/", (req, res) => {
  res.send("Hello Express");
});

app.get("/users", (req, res) => {
  const userList = [
    {
      userSeq: 1,
      name: "홍길동",
      phone: "01022223333",
      email: "abc@gmail.com",
    },
    {
      userSeq: 2,
      name: "홍반장",
      phone: "01055552233",
      email: "hong@gmail.com",
    },
    {
      userSeq: 3,
      name: "김기한",
      phone: "01066664444",
      email: "kim@gmail.com",
    },
    {
      userSeq: 4,
      name: "김이수",
      phone: "01098997554",
      email: "issu@gmail.com",
    },
    {
      userSeq: 5,
      name: "장기호",
      phone: "01053555444",
      email: "jang@gmail.com",
    },
  ];

  const filter = userList.filter((u) => u.name.includes(req.query.name || ""));

  res.send(filter);
});

app.listen(port, () => {
  console.log(`Example app listening at http://localhost:${port}`);
});
16. 서버 실행 위한 패키지 다운로드 (express, cors)
npm i express
npm i cors
17. package.json에 "express-start": "node ./expressApiServer.js", 추가
  "scripts": {
    "start": "react-scripts start",
    "express-start": "node ./expressApiServer.js",
    "build": "react-scripts build",
    "test": "react-scripts test",
    "eject": "react-scripts eject"
  },
18. 서버 실행: localhost:8080에서 확인할 수 있다.
npm run express-start
Hello Express가 떴다면 서버가 잘 뜬것임. api는 /user로 사용자 리스트를 제공함. localhost:8080/users를 주소창에 입력하면
사용자 리스트가 뜬다.
19. 리덕스 사가 다운로드
npm i redux-saga
20. 메인 리덕스 사가 함수를 만들어준다.
src > reducers > index.js
// src > reducers > index.js

import { combineReducers } from "redux";
import { fork, all } from "redux-saga/effects";
import userReducer from "./user/reducer";
import userSaga from "./user/saga";

export const reducers = combineReducers({
  userReducer,
});

// 사가 함수를 작성할땐 * 별표 키워드와 함께 시작
export function* rootSaga() {
  yield all([fork(userSaga)]);
}
21. saga.js를 src > reducers > user 폴더에 아래와 같이 생성
// src > reducers > user > saga.js

import { takeLatest, call, put, all } from "redux-saga/effects";
import {
  SEARCH_USERS_FAIL,
  SEARCH_USERS_REQ,
  SEARCH_USERS_SUCCESS,
} from "./action";
import axios from "axios";

function getUsers(params = "") {
  // api호출을 하기 위해 axios를 사용한다.
  // users api 호출을 위해 해당 주소를 가져오고 params를 합쳐서 검색 조건에 따라 필터가 되도록 한다.
  return axios.get("http://localhost:8080/users" + params);
}

// 사용자 검색 액션 요청에 따라 실행되는 함수
// 이 함수를 통해 액션을 dispatch해서 api를 호출하여 결과를 전달함
// 먼저 api를 호출하는 함수를 만든다
function* searchRequest(action) {
  // call 함수를 이용해 api를 호출한다
  // call은 함수를 동기적으로 실행해줌
  // getUsers 함수를 호출하고 SEARCH_USERS_REQ 액션 실행시 전달되는 params를 getUsers함수로 넘긴다
  const userData = yield call(getUsers, action.params);
  // put으로 action dispatch 해줌
  // try catch 이용해 성공시 실패시를 분기처리하기
  try {
    yield put({ type: SEARCH_USERS_SUCCESS, data: userData.data });
  } catch (error) {
    yield put({ type: SEARCH_USERS_FAIL, data: error.response.data });
  }
}
// SEARCH_USERS_REQ 액션을 감지하는 함수를 userSaga에 세팅
function* waitSearchReq() {
  // yield는 다음 동작을 제어하는 의미를 가지는 es6문법
  // takeLatest는 가장 마지막에 실행된 액션을 감지하는 것
  // 두번째로 핸들러를 제공해서 실행할 함수를 구성한다.
  yield takeLatest(SEARCH_USERS_REQ, searchRequest);
}

//1. userSaga를 먼저 만든다음 액션을 리슨하는 함수를 만든다.
export default function* userSaga() {
  // all 함수는 내부배열에 등록된 사가 함수들을 리덕스 사가 미들웨어에 등록하는 부수효과 함수
  // 다음으로 rootSaga함수 세팅하기
  yield all([waitSearchReq()]);
}
22. src > index.js 를 다음과 같이 추가
// src > index.js

import React from "react";
import ReactDOM from "react-dom/client";
import "./index.css";
import App from "./App";
import reportWebVitals from "./reportWebVitals";
import { BrowserRouter } from "react-router-dom";
import { Provider } from "react-redux";
import { reducers, rootSaga } from "./reducers";
import { createStore } from "redux";
import createSagaMiddleware from "@redux-saga/core";
import { applyMiddleware } from "redux";

// 사가 미들웨어 생성
const sagaMiddleware = createSagaMiddleware();

// 그다음 스토어에 applyMiddleWare이용해 미들웨어 연결
const store = createStore(reducers, applyMiddleware(sagaMiddleware));

// 그다음 사가 미들웨어에서 통합 사가 함수를 실행시킨다
sagaMiddleware.run(rootSaga);

const root = ReactDOM.createRoot(document.getElementById("root"));
root.render(
  <React.StrictMode>
    <Provider store={store}>
      <BrowserRouter>
        <App />
      </BrowserRouter>
    </Provider>
  </React.StrictMode>
);

// If you want to start measuring performance in your app, pass a function
// to log results (for example: reportWebVitals(console.log))
// or send to an analytics endpoint. Learn more: https://bit.ly/CRA-vitals
reportWebVitals();
23. 이렇게 사가 함수를 연결했으면 웹에서 확인 해 본다. (localhost:3000/search 로 이동)
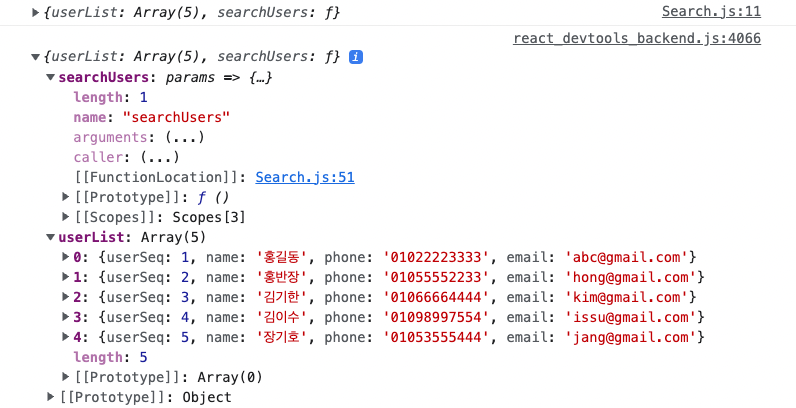
검색 버튼을 눌렀을때 searchUsers를 통해 SEARCH_USERS_REQ 액션을 전달해 실행하므로 검색 버튼을 누르면 콘솔에 아래와 같이 데이터들이 출력되어야 함.
api 요청은 크롬 개발자도구의 network에서 확인 가능하다.
23. 화면에 데이터들을 출력하기 src > componnet > Search.js
// src > componnet > Search.js

import { useState } from "react";
import { connect } from "react-redux";
import { searchUsersReq } from "../reducers/user/action";

const { Link } = require("react-router-dom");

const Search = (props) => {
  const { userList = [], searchUsers } = props;
  const [name, setName] = useState("");

  return (
    <>
      <div>
        <div>
          <Link to="/">메인 페이지로</Link>
        </div>
      </div>
      검색페이지
      <div>
        <input value={name || ""} onChange={(e) => setName(e.target.value)} />
        <button onClick={() => searchUsers(`?name=${name}`)}>검색</button>
        <div>
          <table>
            <thead>
              <tr>
                <th>이름</th>
                <th>전화번호</th>
                <th>이메일</th>
              </tr>
            </thead>
            <tbody>
              {userList?.map((user) => (
                <tr key={user.name}>
                  <td>{user.name}</td>
                  <td>{user.phone}</td>
                  <td>{user.email}</td>
                </tr>
              ))}
            </tbody>
          </table>
        </div>
      </div>
    </>
  );
};

const mapDispatchToProps = (dispatch) => {
  return {
    searchUsers: (params) => dispatch(searchUsersReq(params)),
  };
};

const mapStateToProps = (state) => {
  return {
    userList: state.userReducer.userList,
  };
};

export default connect(mapStateToProps, mapDispatchToProps)(Search);
위와 같이 userList를 map 함수를 이용해 화면에 출력해준다.
24. 검색 버튼을 눌렀을 때, 출력된 화면의 모습
메인페이지: localhost:3000

search 페이지: localhost:3000/search

References
실습 예제: SiliValleyDeveloper 실리한 개발자 Youtube
'공부 정리' 카테고리의 다른 글
| 22.12.08: IT 인프라 (0) | 2022.12.08 |
|---|---|
| 22.12.07: 리팩토링 - 추상화 도전(?) (0) | 2022.12.07 |
| 22.11.30: Redux + thunk, saga (0) | 2022.12.02 |
| 22.11.29: 리액트의 렌더링 최적화 (useCallback, React.memo, useMemo) (0) | 2022.11.29 |
| 22.11.28: git commit message (0) | 2022.11.28 |


